Main Panel
This is the central part of the VDAT window. It is divided in two parts:
- a column on the left: it shows the reduction steps as horizontal tabs and, on the lower part, buttons to execute one or more commands;
- a big area on the right: typically this part shows fits files for the directory and the step selected.

Screenshot of the central VDAT panel, showing all the elements discussed in this section
Configuration file
The content of the main panel is configurable by the user. The configuration
file is written according to the YAML standard. VDAT
ships a standard tasks.yml file, that can be retrieved using the
vdat_config copy command. When starting, vdat will look for such a file
in the current directory. A different file can be provided using the
-t/--tasks-config command line options.
The configuration file must contain a number of sections, one for each type of files that the user wants to visualize. The name of the sections correspond to the types that are shown in the Reduction browser. Each section contains a list of steps, each one corresponding to one of the horizontal buttons in the upper part of the left panel. The main structure is as in this example:
zro:
    # configuration for the zero/bias shots
    - # step 1
      [...]
    - # step n
      [...]
cal:
    # configuration for the flat and arc shots
    - # step 1
      [...]
    - # step n
      [...]
sci:
    # configuation for the science shots
    - # step 1
      [...]
    - # step n
      [...]
Each step has three sections, like in this example:
- step_name: Raw
  buttons:  # description of the buttons to create
      - # button 1
        [...]
      - # button n
        [...]
  tabs:  # descriptions of the tabs to show
      - # tab 1
        [...]
      - # tab n
        [...]
step_name(mandatory): this is the name that appears in the horizontal tab. Typically it represents one step of the reduction process.buttons(optional): list of buttons to show in the lower part of the left panel. See The buttons for further information.tabs(optional): list of tab types to show in the right panel. See The tabs for more info.
The buttons
To each step can be associated one or more button, each of which can run one or more commands. Each command is interpreted and run as described in The Command Interpreter Tool.
The buttons are defined as a list and each item is composed by:
name(mandatory): the name that appears in the button.commands(mandatory): a string or a list of strings. Each string define a command that will pushed into a queue when the button is clicked.tool_tip(optional): if provided, the text is used as tool tip for the button.
As an example, the following will create two buttons, called Subtract
Overscan and Reduce, associated with one and two commands, respectively.
Hovering over the first button the string Subtract the overscan from the
frame will appear, while the second doesn’t show any tooltip.
buttons:
  - name: Subtract Overscan
    commands: subtractfits $args -o $biassec $fits
    tool_tip: 'Subtract the overscan from the frame'
  - name: Reduce
    commands:
      - subtractfits $args -o $biassec $fits
      - masterbias $args -o $target_dir/$masterbias_file $fits
The tabs
For each step and file type, the user might want to inspect files, logs and have tools to validate or compare the results. To allow this, we reserve the largest portion of the VDAT GUI. In this area multiple tabs can be added by the user via the aforementioned configuration file.
Tabs are defined as a list under the tabs section. Each item must have the
tab_type entry, specifying the type of tab to add, while all the other
entries depend on the type of tab. Each tab type can create one or more tabs,
according to its specifications. A generic configuration entry looks like the
following example:
tabs:
    - tab_type: type1
      [all the options for the tab type 1]
    [...]
    - tab_type: typeN
      [all the options for the tab type N]
VDAT ships with few tab types, described in Builtin tab types. Also it is possible to add extra tabs types using the plugin mechanism described in New tab types.
List available tab types
VDAT provides a way to discover which tab types are available on the system,
via the vdat_plugins executable. The command:
vdat_plugins tab_types
lists all the available tab types names; the option -v\--verbose will show
the doc strings for all the tab types. It is also possible to display only one
type providing its name in the command line. E.g:
vdat_plugins tab_types exp_combined
shows only the exp_combined type and its doc string (this command ignores
the verbose settings).
Builtin tab types
In this section are described the builtin types and the arguments required to use them. We will provide more types in the future.
All the builtin tab types, unless otherwise noted, use the focal plane file
provided via the [fplane] section main vdat configuration file to build the
focal plane shown in the tabs. If the input file, given with the option
fp_filename contains IFUs that you don’t want to show, it is possible to
list the undesired IFUSLOTs using the exclude_ifuslot option. Finally the
respect_empty option allows to decide whether empty rows and columns in the
focal plane file must be shown (yes) or can be hidden (no). Here is an
example of the relevant configuration entries:
[fplane]
# Settings related to the focal plane
fp_filename = ${general:config_dir}/fplane.txt
# (optional, default empty) comma separated list of IFUSLOTs that should not be
# shown in the GUI. There is no harm listing IDs even if they are not in the
# fplane file
exclude_ifuslot = 000, 555, 056, 066
# (optional, default: ``yes``) If the options is set to ``no``, the focal plane
# uses the maximum available space and all the empty columns and rows are not
# shown. If ``yes``, shows empty internal rows and columns, but not outside the
# range of existing IFUs.
# Example: the focal plane has the following two IFUSLOT: 073 and 095.
# * if ``no``: the two IFUs are shown at the upper left and lower right corners
#   of a 2x2 square, i.e. the empty column and row between them is not shown
# * if ``yes``: the two IFUs are shown at the upper left and lower right
#   corners of a 3x3 square
respect_empty = yes
Note
the same focal plane file is used internally by the VDAT GUI to register the selected IFUs.
exp_fits and exp_combined
Each shot consists of a number of exposures. Also multiple calibration shots
might be combined into a unique directory by VDAT. These tab types allow to
show each exposure in one tab. The difference between the two types is that the
exp_fits type shows the fits files, while the exp_combined adds a
checkbox that can be used to display to a “quick reconstruction” image.
Both types accept the options described below, together with the formatting names available for building file names and tab titles.
-
vdat.gui.tabs.entry_points.exp_fits(target_dir, tab_dict, step_name, cache, parent_widget)[source] Create or retrieve and return tabs of type
tab_widget.FitsFplanePanel. Each tab represent one exposure in one of the types intarget_dir.This tab type accepts the following configuration options:
tab_type(mandatory): name of the type.file_name(mandatory): name of the file(s) to show. It is possible to format the file name using the python formatting syntax.cols,rows(optional): list of objects, typically strings. The thumbnail gets divided into len(cols)*len(rows) quadrants and each one shows one file.title(optional): title to use for the tab; if absent'{step} {orig_type} {exp}'is used. It is possible to format the title similarly to thefile_name.tool_tip(optional): tooltip to show when hovering on the tab name; it is possible to format the tool_tip similarly to thefile_name.header_keys(optional): list of strings. Header keywords to show on top of the others in the fits viewer window.
Available formatting names:
ifuslot,ifuid,specid(file_nameonly): ID of the slot, of the IFU bundle and of the spectrograph it is connected to.basename: date-time part of the file name.col,row(file_nameonly): replaced with each of the elements in thecolsandrowsconfiguration options.step: name of the step at handtype: type of the file(s) in the target directory, i.e. the name shown in the GUI.orig_type: original type of the file(s) in the target directory.object: value of the OBJECT header keyword.exp: exposure number.
See
interface.plugin_interface()for the signature of this function.
-
vdat.gui.tabs.entry_points.exp_combined(target_dir, tab_dict, step_name, cache, parent_widget)[source] Same as
exp_fits(), but using tabs of typetab_widget.FitsAndReconFplanePanel.
As example the following configuration creates the tabs shown in the image below.
- &cal_raw_exp_combined
  tab_type: exp_combined
  file_name: '{basename}_{ifuslot}{col}{row}_{orig_type}.fits'
  cols: ['L', 'R']
  rows: ['U', 'L']
  title: '({step}) {object}: {exp}'
  tool_tip: '({step}) {object}, {type}, {orig_type}: {exp}'
  header_keys: ['SPECID', 'IFUID', 'IFUSLOT', 'CCDPOS', 'CCDHALF']

Screenshot of the tabs created by the exp_combined type, when selecting a
directory containing two cmp, one flt and one twi shots, each one with one
exposure.
The tab types create multiple tabs, one per each exposure in the selected
directory. Each of the squares represent one IFU. If one shows a white “X” on
black, it means that no file has being found. Otherwise the area is divided in
parts, according to the number of cols and rows in the configuration,
and each part is filled with the thumbnail of one file. In the example there
are four files per IFU per exposure. Each file is displayed using the zscale
scaling algorithm.
Since each IFU is represented by a rectangle only a few centimeters in size,
we don’t display the fits files themselves, but a much smaller thumbnail that
is created, updated or removed at need. Users can remove thumbnails from the
selected directory or from everywhere using the File menu.
If at least one file is shown, the user can change the scaling of the images
using the radio buttons below the focal plane. Global repaint the
thumbnails using the absolute minimum and maximum index from the zscale
algorithm. The limits are shown in a tool tip that appears when hovering over
the button for a few seconds. The Custom button allow to set user selected
upper and lower limits; the limit submitted via the Rescale button are
applied on all the IFUs.
The three radio buttons can also be used to repaint the thumbnails. This is useful, e.g., when files has been created or removed.
For the exp_combined type, the Reconstructed checkbox on the lower
right part allows to switch between a view showing the fits files and one
showing their combination. This use the
QuickReconstructedIFU to build an
approximated image from the fits files. The image is created only if all the
files required exists. The reconstruction algorithm needs some extra
information to know where fibers located on the fits files and which part of
the sky they see. The information are provided to VDAT via the
vdat_setting.cfg file:
[reconstruction]
# The name of the IFUCen file
ifucen = ${general:extra_files}/IFUcen_HETDEX.txt
default_dist_r = ${general:extra_files}/defaultR.dist
default_dist_l = ${general:extra_files}/defaultL.dist
pixscale = 0.5
VDAT provides a copy of such files and, of course, the user can use other files as fit. The pixel scale gives the size of a pixel: the smaller the number the more pixels will be used in the reconstructed image and the more realistic it will look (with all the caveats given by the fact that the reference files might not be accurate for the files at hand). This comes at the cost of greater time needed to initialize the reconstruction. However we cache the object used to performed the reconstruction, so the impact of the pixel scale will be visible only when creating the first tab that requires it.
In order to be able to run command, at least one IFU must be selected. This can be achieved by clicking on the desired IFUs. When selected, an IFU shows a blue border. Clicking on a selected IFU, will deselect it. It is also possible to select or deselect all the IFUs using Select menu.
The tab type also offers the possibility to inspect both the fits files and the
reconstructed image in a dedicated window. Double clicking will bring up a
window with as many tabs as there are fits files in the IFU or, if clicking on
the reconstructed image, with only one tab. The window shows both the fits
files data and their header. Via the header_keys option in the yaml
configuration, it is possible to enhance some header keywords by putting them
on top of the list. The window is described with more details in
The FITS viewer.
fits and fits_combined
When creating master frames, the user combines multiple exposures into one
single fits file. Thus the previous tab type is not suited to display these new
files and the fits or fits_combined type can be used:
-
vdat.gui.tabs.entry_points.fits(target_dir, tab_dict, step_name, cache, parent_widget)[source] Create or retrieve and return one or more tabs of type
tab_widget.FitsFplanePanel. Each tab represents one file type chosen by the user.This tab type accepts the following configuration options:
tab_type(mandatory): name of the type.file_name(mandatory): name of the file(s) to show. It is possible to format the file name using the python formatting syntax.file_types(optional): can be'type','orig_type','object'or a user defined string. This entry is used in the following way:- If the value of
file_typesis any of'type','orig_type','object': the corresponding information is extracted from the internal database and interpreted as a list. If e.g. the'orig_type'is used and the database contains for the entry the following'cmp, flt'value, two tabs will be created and the{orig_type}formatting key will be replaced with'cmp'in one tab and'flt'in the other. - If the value of
file_typesis any of'type','orig_type','object'and if it present as a keyword in the tab configuration: the content of the keyword is used, instead of the internal information. The value of the keyword must be a list. If e.g. the'orig_type'is used and there is one keyword whose value is['flat', 'arc'], two tabs will be created and the{orig_type}formatting key will be replaced with'flat'in one tab and'arc'in the other. - If the value is a custom string: this string must be present in the
tab configuration and its value must be a list. It is also added in the
list of available formatting names to allow substitutions. If e.g. the
'custom'string is used, there must be one such key. If its value is['my', 'tab'], two tabs will be created and the{custom}formatting key will be replaced with'my'in one tab and'tab'in the other.
Default:
'orig_type'.- If the value of
cols,rows(optional): list of objects, typically strings. The thumbnail gets divided into len(cols)*len(rows) quadrants and each one shows one file.title(optional): title to use for the tab; if absent'{step} {orig_type}'is used. It is possible to format the title similarly to thefile_name.tool_tip(optional): tooltip to show when hovering on the tab name; it is possible to format the tool_tip similarly to thefile_name.header_keys(optional): list of strings. Header keywords to show on top of the others in the fits viewer window.
Available formatting names:
ifuslot,ifuid,specid(file_nameonly): ID of the slot, of the IFU bundle and of the spectrograph it is connected to.col,row(file_nameonly): replaced with each of the elements in thecolsandrowsconfiguration options.step: name of the step at handtype: type of the file(s) in the target directory, i.e. the name shown in the GUI.orig_type: original type of the file(s) in the target directory.object: value of the OBJECT header keyword.
See
interface.plugin_interface()for the signature of this function.
-
vdat.gui.tabs.entry_points.fits_combined(target_dir, tab_dict, step_name, cache, parent_widget)[source] Same as
fits(), but using tabs of typetab_widget.FitsAndReconFplanePanel.
These types produce one or more tabs that look and behave like the
exp_combined ones. E.g.
zro:
    step_name: Masterbias
    tabs:
        - &masterbias_tab
        tab_type: fits_combined
        file_name: 'masterbias_{ifuslot}_{col}{row}.fits'
        cols: ['L', 'R']
        rows: ['U', 'L']
        title: '{step}'
        tool_tip: 'Reduction {step}. Masterbias'

cal:
    step_name: Masterframes
    tabs:
        - <<: *masterbias_tab
          orig_type: ['flat', 'arc', 'twi']
          file_name: 'master{orig_type}_{ifuslot}_{col}.fits'
          rows: ['',]
          title: 'Master{orig_type}'
Will create one tab (Masterbias) for a zro directory and three
(Masterflat, Masterarc and Mastertwi) for a cal directory. An
example of the latter is shown in the figure below.
Screenshot of the tabs created by the fits_combined type, when
selecting a directory containing a master frame for arcs, flats and
twilights.
Without providing the orig_type keyword, VDAT would have used the
information from the internal database and would have created three tabs with
{orig_type}, both in the file name and the tab title, replaced by cmp,
flt, twi.
If for some reason orig_type from the example above does not suffice, it is
possible to specify a custom list of file types. The following example will
create three tabs called cmp, flt, twi round, cmp, flt, twi bow and
cmp, flt, twi 42.
cal:
    tabs:
        - <<: *masterbias_tab
          file_types: custom_name
          custom_name: ['round', 'bow', '42']
          file_name: 'master{custom_name}_{ifuslot}_{col}.fits'
          rows: ['',]
          title: '{orig_type} {custom_name}'
Clicking and double clicking on each IFU behaves as described at the end of exp_fits and exp_combined.
fits_cube
This tab type is almost identical to the fits one, except for the fact that
is specialised for displaying data cubes. It accepts only one extra
configuration option:
-
vdat.gui.tabs.entry_points.fits_cube(target_dir, tab_dict, step_name, cache, parent_widget)[source] Same as
fits(), but using tabs of typetab_widget.CubeFplanePanel.On top of the configuration options described in
fits(), this tab type accepts the following options:z_indx(optional): before creating the thumbnail for the data cubes, the image is compressed along the z-dimension using the median; ifz_indxis not given or is[null, null], it uses the whole range, otherwise it uses only the part of the cube in the range [z_indx[0], z_indx[1])
This type produce one or more tabs that look and behave like the fits ones.
As example take the following configuration entries:
- &sci_cube_tab
  tab_type: fits_cube
  title: 'Cube 20'
  file_name: 'CuFeSpdsses_{ifuslot}.fits'
  z_indx: [null, 40]
  tool_tip: 'Compressed cube slice'
-
  <<: *sci_cube_tab
  title: 'Cube 600'
  z_indx: [550, 650]
This creates two tabs, called Cube 20 and Cube 600, each showing a
compressed slice of the data cube; the former tab shows the data for z index in
the range [1, 40] while the latter for [551, 650]. The compression is done
using numpy.nanmedian(). If z_indx is not given or its value is
[null, null] the full cube is compressed. The following image shows an
example of the focal plane created by the above configuration
Screenshot of the tabs created by the fits_cube type
Clicking and double clicking on each IFU behaves as described at the end of
exp_fits and exp_combined. In addition in this case the The FITS viewer also uses
the z_indx option.
fits_multiext
This tab type is almost identical to the fits one, except for the fact that
it display the desired extensions from multi extensions fits files. It accepts
one extra configuration option and provide one more formatting name, described in:
-
vdat.gui.tabs.entry_points.fits_multiext(target_dir, tab_dict, step_name, cache, parent_widget)[source] Same as
fits(), but using tabs of typetab_widget.MultiExtFplanePanel.On top of the configuration options described in
fits(), this tab type accepts the following options:extensions(list of ints or strings): indices or names of the fits extensions to display in the IFU.
On top of the formatting names described in
fits(), this tab type has this additional formatting name:ext: index or name of the extension displayed
This type produce one or more tabs that look and behave like the fits ones.
As example the following configuration:
- &cal_fmod
  tab_type: fits_multiext
  orig_type: ['twi', ]
  file_name: 'master{orig_type}_{ifuslot}_{col}.fmod'
  rows: ['',]
  cols: ['L', 'R']
  title: 'mastertwi fmod {ext}'
  extensions: ['AMPLITUDE', 'Y', 'SIGMA', 'H2', 'H3', 'EXP']
creates six tabs, called mastertwi fmod AMPLITUDE, mastertwi fmod Y and
so on. Each tab shows the one extension of the fits file called
mastertwi_{ifuslot}_{col}.fmod. The following configuration:
- <<: *cal_fmod
  extensions: [1, 2, 3, 4, 5, 6]
creates the same tabs, but with titles like mastertwi fmod 1 and possibly
with a different order. An example of the tabs can be seen in the image below:
Screenshot of the tabs created by the fits_multiext type
Clicking and double clicking on each IFU behaves as described at the end of
exp_fits and exp_combined. In addition in this case the The FITS viewer also uses
the ext option.
reconstruct
Science shots usually consist of multiple dithered exposures, typically three
for HETDEX observations. The reconstruct tab type allows to merge all the
exposures of one shot into one image. The type creates always only one tab. The
configuration options and formatting names are very similar to the previous two
tab types:
-
vdat.gui.tabs.entry_points.reconstruct(target_dir, tab_dict, step_name, cache, parent_widget)[source] Create or retrieve and return a tab of type
tab_widget.QuickReconFplanePanel. It collects all the exposures for thetarget_dirand combine all of them in a single reconstructed image.This tab type accepts the following configuration options:
tab_type(mandatory): name of the type.file_name(mandatory): name of the file(s) to show. It is possible to format the file name using the python formatting syntax.cols,rows(optional): list of objects, typically strings. The thumbnail gets divided into len(cols)*len(rows) quadrants and each one shows one file.title(optional): title to use for the tab; if absent'{step} {orig_type}'is used. It is possible to format the title similarly to thefile_name.tool_tip(optional): tooltip to show when hovering on the tab name; it is possible to format the tool_tip similarly to thefile_name.header_keys(optional): list of strings. Header keywords to show on top of the others in the fits viewer window.
Available formatting names:
ifuslot,ifuid,specid(file_nameonly): ID of the slot, of the IFU bundle and of the spectrograph it is connected to.col,row(file_nameonly): replaced with each of the elements in thecolsandrowsconfiguration options.basename(file_nameonly): date-time part of the file name.step: name of the step at handtype: type of the file(s) in the target directory, i.e. the name shown in the GUI.orig_type: original type(s) of the file(s) in the target directory.object: value(s) of the OBJECT header keyword.
See
interface.plugin_interface()for the signature of this function.
Reusing the configuration entries shown for exp_combined, we can easily
create one tab the exposure and add a reconstruct tab as shown here:
   tabs:
       - *cal_raw_exp_combined
       - <<: *cal_raw_exp_combined
         tab_type: reconstruct
         title: '{step} reconstructed'
         tool_tip: 'Reduction {step}. Object: {object}; type: {type}; original type: {orig_type}'
The figure below shows the result for the reconstruct type. The tab behaves
and feels like in the previous cases, with the exception that there is no
"Reconstructed" button to switch between the fits files and the
reconstructed image.
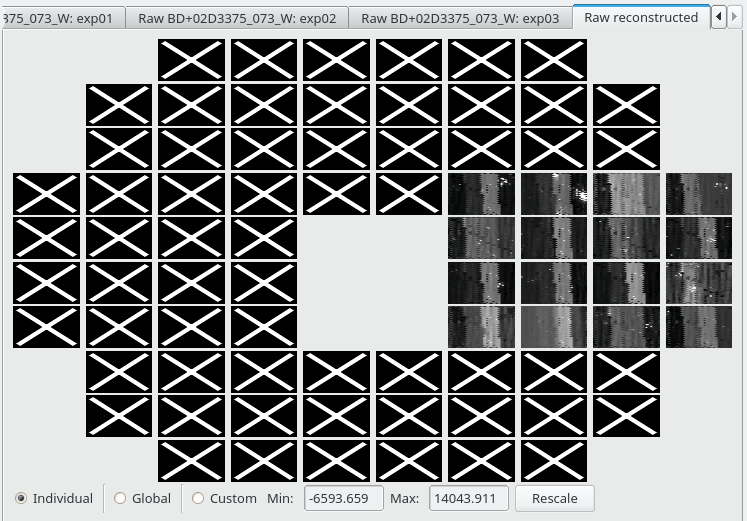
Screenshot of the tabs created by the reconstruct type
Clicking and double clicking on each IFU behaves as described at the end of the
exp_combined section. The
text_file
Some reduction steps create text files and this tab type allow to show them. The number of lines is shown in the focal plane. The configuration options and formatting names are very similar to the previous tab types:
-
vdat.gui.tabs.entry_points.text_file(target_dir, tab_dict, step_name, cache, parent_widget)[source] Create or retrieve and return one tab of type
tab_widget.TextFileWidget.This tab type accepts the following configuration options:
tab_type(mandatory): name of the type.file_name(mandatory): name of the file(s) to show. It is possible to format the file name using the python formatting syntax.title(optional): title to use for the tab; if absent'{step}'is used. It is possible to format the title similarly to thefile_name.tool_tip(optional): tooltip to show when hovering on the tab name; it is possible to format the tool_tip similarly to thefile_name.
Available formatting names:
ifuslot,ifuid,specid(file_nameonly): ID of the slot, of the IFU bundle and of the spectrograph it is connected to.step: name of the step at handtype: type of the file(s) in the target directory, i.e. the name shown in the GUI.orig_type: original type(s) of the file(s) in the target directory.object: value(s) of the OBJECT header keyword.
See
interface.plugin_interface()for the signature of this function.
An example of a configuration entry for the text_file tab is shown here:
tabs:
    - tab_type: text_file
      file_name: 'dither_{ifuslot}.txt'
      title: 'Dither file'
      tool_tip: 'Reduction {step}. Show the dither file'
The figure below shows a tab created with the above configuration. The tab
behaves and feels like in the previous cases. However the content is very
different: the upper line shows the total number of lines, while the one lower
one shows within parenthesis the number of non comment lines. A comment line
starts with #.
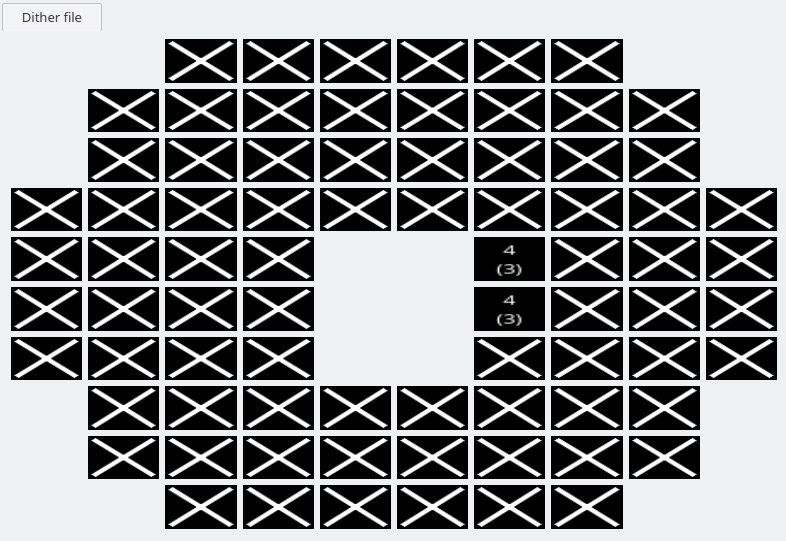
Screenshot of the tab created by the text_file type
Clicking on each IFU behaves as described at the end of the exp_combined
section. On double click, a The text file viewer window is opened, if the
file exists.
dist
One of the products of the deformer step are distortion solutions. This tab
type shows if distortion files have been produced (i.e. if the deformer step
worked) and allow to display them. The configuration options and formatting
names are :
-
vdat.gui.tabs.entry_points.dist(target_dir, tab_dict, step_name, cache, parent_widget)[source] Create or retrieve and return one tabs of type
tab_widget.DistPanel.This tab type accepts the following configuration options:
tab_type(mandatory): name of the type.file_name(mandatory): name of the distortion file(s) to show. It is possible to format the file name using the python formatting syntax.fits_names(mandatory): list of names of the fits files to use then displaying the distortion in DS9. If the list is empty, it is not possible to display the data on DS9.cols,rows(optional): list of objects, typically strings. The thumbnail gets divided into len(cols)*len(rows) quadrants and each one shows one file.title(optional): title to use for the tab; if absent'{step} {orig_type}'is used. It is possible to format the title similarly to thefile_name.tool_tip(optional): tooltip to show when hovering on the tab name; it is possible to format the tool_tip similarly to thefile_name.
Available formatting names:
ifuslot,ifuid,specid(file_nameandfits_namesonly): ID of the slot, of the IFU bundle and of the spectrograph it is connected to.col,row(file_nameandfits_namesonly): replaced with each of the elements in thecolsandrowsconfiguration options.step: name of the step at handtype: type of the file(s) in the target directory, i.e. the name shown in the GUI.orig_type: original type of the file(s) in the target directory.object: value of the OBJECT header keyword.
See
interface.plugin_interface()for the signature of this function.
An example of a configuration entry for the dist tab is shown here:
tabs:
    - tab_type: dist
      file_name: 'mastertwi_{ifuslot}_{col}.dist'
      fits_names: ['mastertwi_{ifuslot}_{col}.fits', 'masterarc_{ifuslot}_{col}.fits']
      rows: ['',]
      cols: ['L', 'R']
      title: 'mastertwi distortion'
The figure below shows a tab created with the above configuration. The tab
behaves and feels like in the previous cases. However the content shows the
version of the distortion file, in the image D: 17, and whether the region
file has been created (R: yes or R: no).
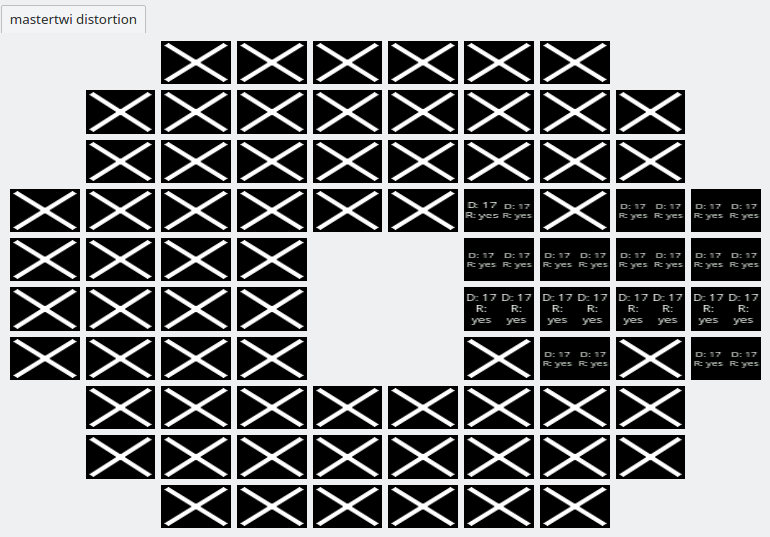
Screenshot of the tab created by the dist type
Clicking on each IFU behaves as described at the end of the exp_combined
section. On double click, a The distortion file viewer window is opened, if the
at least one of the region files exist.